XAUUSD 1-Minute SMC Sell Setup: H1 Resistance, CHoCH and SBR Entry
The XAUUSD 1-minute SMC sell setup is a multi-time-frame trading model that combines higher-time-frame resistance with 1-minute market structure and price-action confirmation.
The setup is designed to avoid selling simply because price reaches resistance.
Instead, the trader waits for a bearish market-structure shift and then looks for a controlled retracement before entering.
This XAUUSD 1-minute sell setup focuses on confirmation rather than chasing the initial bearish move.
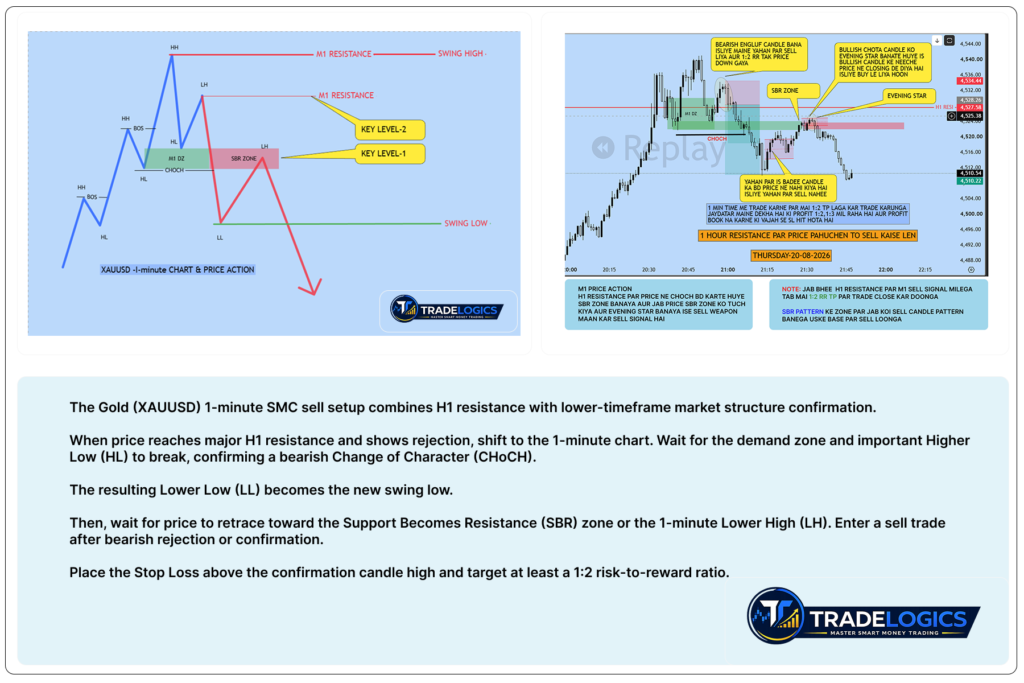
The basic sequence is:
H1 Resistance → 1-Minute Bearish CHoCH → Lower Low → Retracement → SBR Zone or Lower High → Bearish Candle Confirmation → Sell Entry
H1 Resistance Provides the Trading Context
The setup begins by identifying a major resistance or swing-high area on the higher timeframe.
When XAUUSD reaches this resistance, the trader observes the price action for signs of rejection. The resistance provides the bearish context, but it is not by itself an entry signal.
Once rejection becomes visible, the analysis shifts to the 1-minute chart to look for confirmation.
XAUUSD 1-Minute Sell Setup: Market Structure Confirmation
On the 1-minute chart, price may initially be moving through a bullish structure of Higher Highs (HH) and Higher Lows (HL).
The key confirmation comes when price breaks an important Higher Low. This structural breakdown indicates that the short-term bullish structure has changed.
This is the bearish Change of Character (CHoCH).
The demand zone associated with the previous bullish move may also be broken during this process. However, the important confirmation is the actual market structure break.
This XAUUSD 1-minute sell setup uses the bearish CHoCH as the key confirmation before looking for a sell entry.
XAUUSD 1-Minute Sell Setup: The Lower Low
After the bearish CHoCH, the XAUUSD 1-minute sell setup waits for price to retrace toward the SBR zone or 1-minute Lower High.
This Lower Low becomes an important reference point for the next stage of the setup.
Instead of chasing the bearish move, the trader waits for price to retrace upward. The objective is to find a better location for a potential sell entry.
This creates a structured sequence rather than an impulsive entry after a large bearish candle.
XAUUSD 1-Minute Sell Setup: Two Important Sell Areas
During the retracement, the setup focuses on two key areas.
1. SBR Zone
The first area is the Support Becomes Resistance (SBR) zone.
When a previously supported area is broken and price later returns to that area, it can act as resistance. If bearish rejection appears at the SBR zone, it can provide a potential sell opportunity.
2. 1-Minute Lower High
The second area is the newly formed 1-minute Lower High (LH).
The Lower High represents an area where sellers may attempt to regain control after the initial bearish structure shift.
Therefore, the trader waits for price to retrace toward the SBR zone or Lower High instead of entering during the initial breakdown.
This XAUUSD 1-minute sell setup requires bearish confirmation before the sell entry is taken.
Wait for Bearish Candle Confirmation
Reaching a sell level is not enough.
At the SBR zone or Lower High, wait for clear bearish price-action confirmation. Examples shown in the setup include bearish candle patterns such as a bearish engulfing candle or an evening star.
The purpose of this confirmation is to show that price is rejecting the retracement area and that sellers are attempting to continue the bearish move.
A trader should not enter simply because price touches the level.
Sell Entry, Stop Loss and Take Profit
Once bearish confirmation appears at the SBR zone or Lower High, a potential sell entry can be considered according to the trading plan.
The Stop Loss should be placed above the confirmation candle high or the relevant invalidation level.
The setup uses a minimum 1:2 risk-to-reward ratio as the example trade-management framework.
For example, if the planned risk is 10 points, the target should provide at least 20 points of potential reward.
The actual position size should be determined from the amount of capital being risked and the distance to the Stop Loss.
Complete XAUUSD 1-Minute Sell Sequence
The complete setup can be summarized as:
1. Identify major H1 resistance.
2. Wait for price rejection at the resistance.
3. Move to the 1-minute chart.
4. Observe the bullish structure of HH and HL.
5. Wait for the important HL to break.
6. Confirm the bearish CHoCH.
7. Identify the resulting Lower Low.
8. Wait for price to retrace.
9. Watch the SBR zone and 1-minute Lower High.
10. Wait for bearish candle confirmation.
11. Take the sell entry according to the trading plan.
12. Place the Stop Loss above the confirmation candle high or relevant invalidation level.
13. Target at least a 1:2 risk-to-reward ratio.
Why Patience Matters in This Setup
One of the important principles of this model is not chasing the initial bearish move.
When price breaks the 1-minute structure, it can move quickly. Entering immediately after the breakdown may result in a poor entry location and a larger Stop Loss.
Waiting for the retracement toward the SBR zone or Lower High provides a more structured opportunity to evaluate whether sellers are still active.
The setup therefore focuses on:
Context → Structure → Retracement → Confirmation → Execution
This sequence helps keep the trading decision based on observable price action rather than emotion.
Risk Management
The setup does not guarantee that every trade will be successful. Even when H1 resistance, CHoCH, SBR and bearish candle confirmation align, price can still reverse.
Risk management should therefore remain an essential part of the setup.
A trader should avoid increasing position size simply because multiple confirmations appear. The trade should also be skipped when the required structure or candle confirmation does not develop.
If price invalidates the bearish structure, the original sell idea should no longer be treated as valid.
Key Takeaways
- H1 resistance provides the higher-time-frame bearish context.
- The 1-minute chart is used for detailed entry confirmation.
- A significant HL breakdown helps confirm bearish CHoCH.
- The resulting LL becomes an important structural reference.
- The SBR zone and 1-minute LH are the main retracement areas.
- Bearish candle confirmation is required before the sell entry.
- Stop Loss should be positioned above the relevant confirmation or invalidation level.
- The example setup uses a minimum 1:2 risk-to-reward ratio.
- The trader should wait for confirmation rather than chase the initial bearish move.
Frequently Asked Questions
Conclusion
The XAUUSD 1-minute SMC sell setup combines higher-time-frame resistance with lower-time-frame market-structure confirmation. The trader first identifies the bearish context at H1 resistance, then waits for a 1-minute CHoCH and Lower Low before looking for a retracement.
The SBR zone and Lower High provide the main areas for potential execution, while bearish candle confirmation helps validate the entry.
The core principle is simple: do not sell just because price reaches resistance. Wait for the market to demonstrate a bearish structure shift, allow the retracement to develop, and then execute only after confirmation.
This structured approach keeps the setup focused on market context, price action, disciplined execution, and risk management.