
BTCUSDT Trade Case Study: Why My High-Probability Sell Setup Hit Stop Loss
|
Published: |
30 July 2026 |
|
Category: |
Trading Journal |
|
Market: |
Cryptocurrency |
|
Asset: |
BTCUSDT Perpetual |
Trade Summary
| Item | Details |
|---|---|
| Direction | Sell |
| Higher Timeframe | H4 |
| Execution Timeframe | H1 |
| Entry | 63,987 |
| Stop Loss | 64,800 |
| Take Profit | 62,447 |
| Risk | 1% |
| Risk Reward | 1:2 |
| Result | Stop Loss |
Introduction
Every trading setup is based on probability, not certainty.
On 28 July 2026, I identified a bearish opportunity on BTCUSDT using Smart Money Concepts (SMC). The higher timeframe provided a bearish Order Block, and my plan was to wait for lower-timeframe confirmation before entering a sell trade.
Although every rule of my trading system was followed, the trade eventually hit the stop loss. This case study explains the complete analysis, execution, and lessons learned from that trade.
Daily Market Context
Before planning any trade, I always analyze the Daily chart to understand the overall market direction and identify important resistance and support levels.
The Daily chart showed that BTCUSDT was approaching a significant resistance area while continuing to trade below a major higher-timeframe resistance. This supported a bearish trading bias.
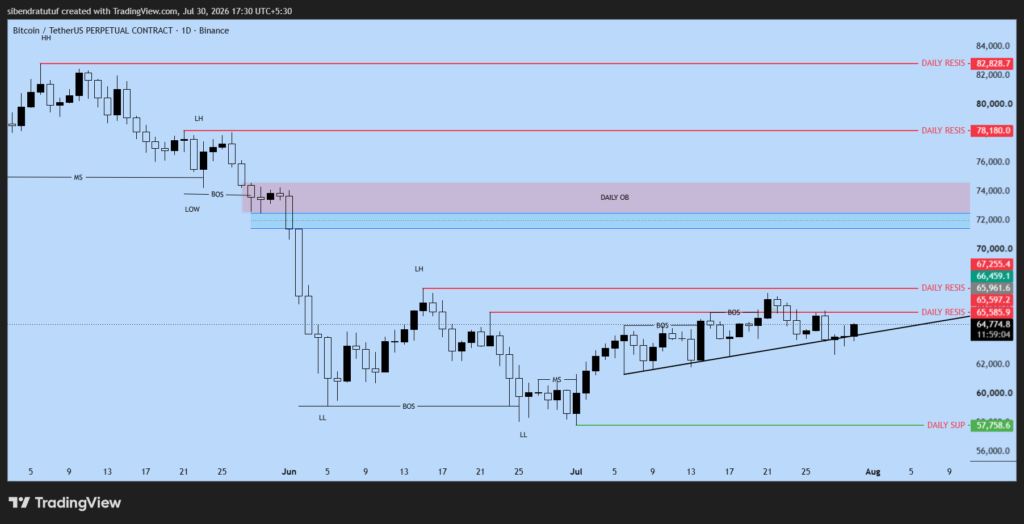
Figure 1: Daily chart showing the higher-timeframe resistance and overall market structure before planning the trade.
H4 Analysis – Planning the Sell Setup
On 28 July 2026, price entered a clearly defined H4 Bearish Order Block. This area became my primary zone of interest for looking at short opportunities.
However, I never enter directly from the higher timeframe. Instead, I wait for confirmation on the lower timeframe.
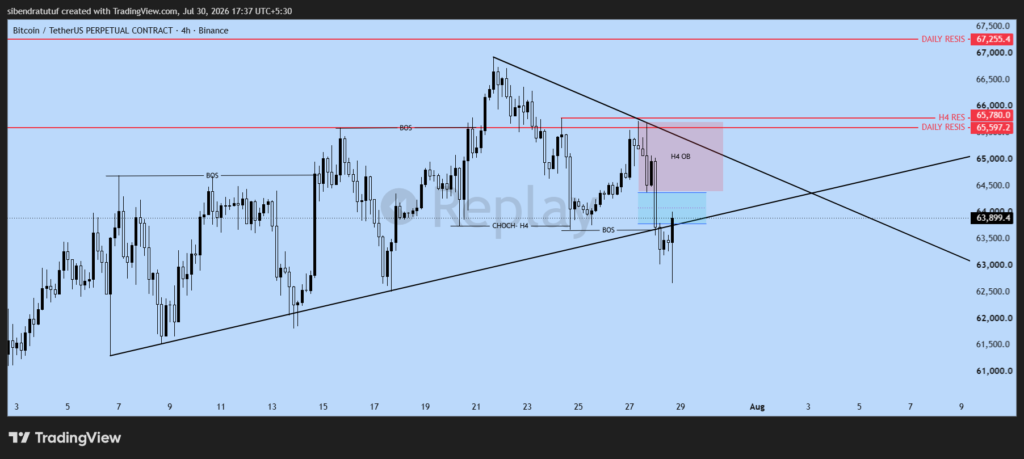
Figure 2: Initial H4 bearish Order Block where the sell setup was planned.
H4 Confirmation
On 29 July 2026, BTCUSDT revisited the H4 Bearish Order Block exactly as anticipated.
At this stage, I did not place a sell order immediately. My trading plan required confirmation from the H1 timeframe before executing the trade.
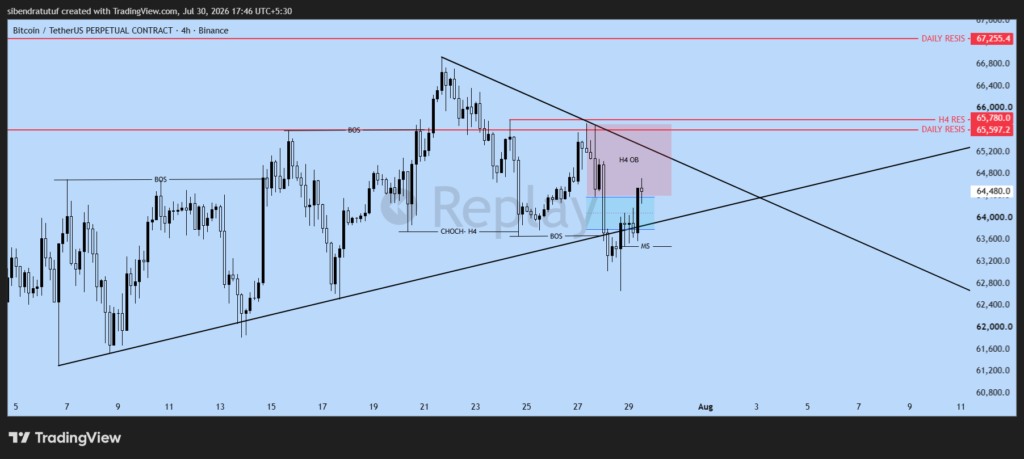
Figure 3: Price entering the H4 Bearish Order Block before switching to the H1 chart.
H1 Confirmation
After price reached the H4 Order Block, I moved to the H1 chart.
My sell checklist required all of the following conditions:
- H1 bearish trendline breakdown
- H1 Market Structure (MS) breakdown
- Fibonacci retracement
- Sell entry only after the retracement
Only after these confirmations did I prepare the trade.
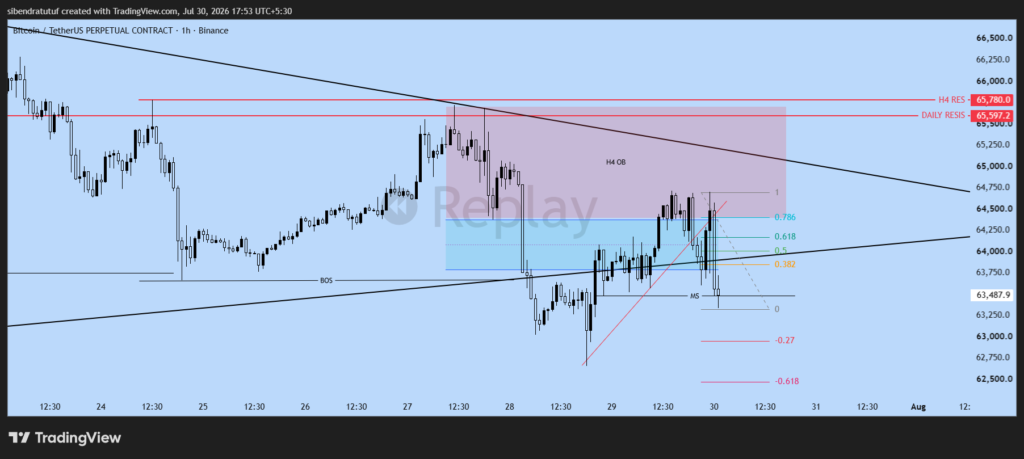
Figure 4: H1 trendline break, market structure shift, and Fibonacci retracement confirming the sell setup.
Trade Execution
Once all confirmation rules were satisfied, I placed a Sell Limit order.
Trade Details
- Entry: 63,987
- Stop Loss: 64,800
- Take Profit: 62,447
- Risk: 1%
- Risk-to-Reward: 1:2
This trade followed every rule of my trading plan.
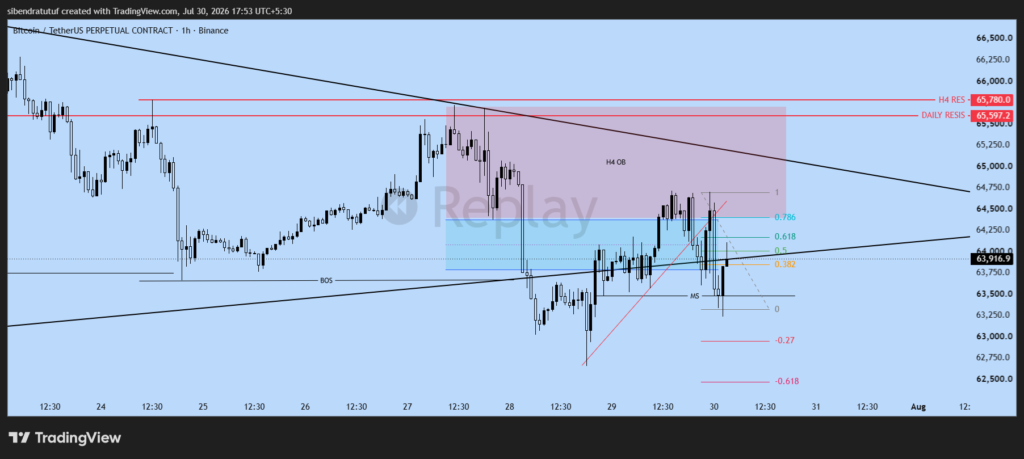
Figure 5: Planned sell entry with predefined stop loss and take profit.
Trade Progress
After the order was triggered, price initially respected the planned area.
However, buyers gained strength, and BTCUSDT began moving higher instead of continuing downward.
The bearish setup gradually weakened as bullish momentum increased.
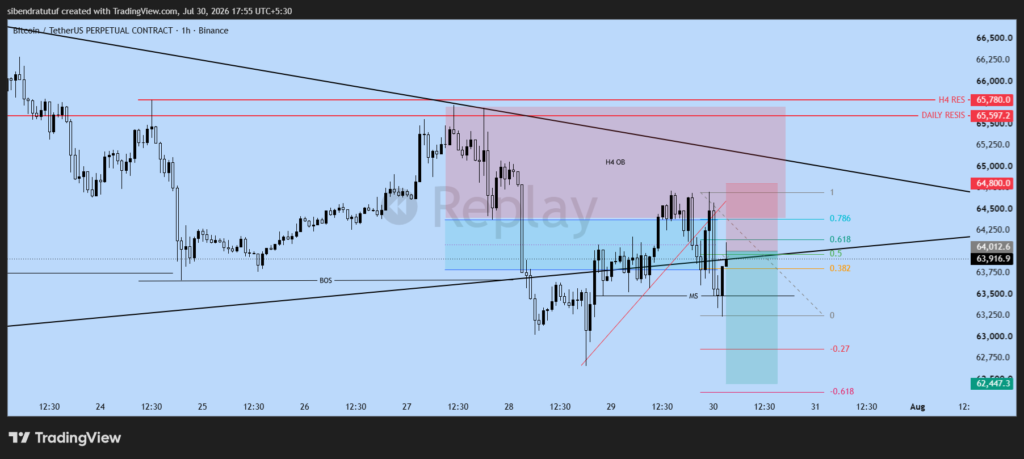
Figure 6: Trade progressing after entry as buyers regained momentum.
Trade Outcome
Eventually, BTCUSDT invalidated the bearish idea and reached my predefined stop loss.
The market proved my analysis wrong for this specific trade, but I did not change my stop loss or break my trading rules.
This was a planned loss, accepted as part of the trading process.
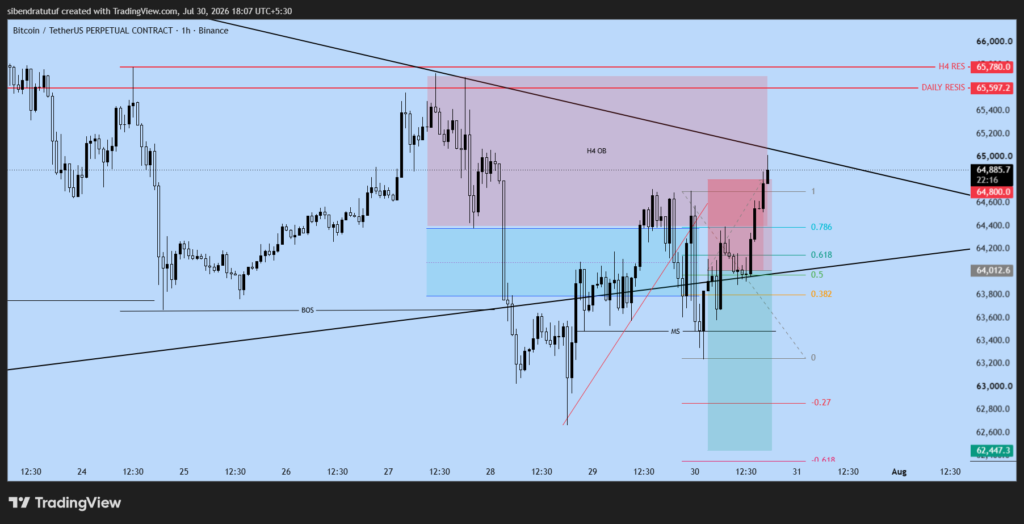
Figure 7: Final trade outcome showing BTCUSDT hitting the stop loss after invalidating the bearish setup.
Why the Trade Failed
Several technical factors contributed to this losing trade:
- Strong buying pressure after the H4 Order Block reaction.
- Failure of bearish continuation on the H1 timeframe.
- Buyers successfully pushed the price above the retracement zone.
- Higher-timeframe bearish probability was invalidated by market momentum.
Although the setup was technically valid, the market chose the opposite direction.
Risk Management
This trade demonstrates why risk management is more important than being right.
My trading rules for every position are:
| Rule | Status |
|---|---|
| Risk only 1% per trade | Yes |
| Fixed stop loss | Yes |
| No revenge trading | Yes |
| Stop trading after two losses | Yes |
| Stop trading after one winning trade | Yes |
| Wait patiently for high-quality setups | Yes |
Because of these rules, this losing trade had only a small impact on my trading capital.
Lessons Learned
This trade reinforced several important lessons:
- A perfect setup does not guarantee a profitable outcome.
- Smart Money Concepts improves probability, not certainty.
- Following the trading plan is more important than the result of one trade.
- Consistent risk management protects trading capital during losing streaks.
- Professional traders evaluate execution, not individual outcomes.
Final Thoughts
This BTCUSDT trade ended in a stop loss, but it was still a professionally executed trade.
Every decision—from higher-timeframe analysis to entry execution and risk management—was made according to my predefined trading rules.
For me, success is not measured by a single winning trade. Success comes from consistently following a disciplined process over hundreds of trades.
TradeLogics Key Takeaway
A professional trader does not try to avoid every loss. Instead, they focus on executing a proven trading process with discipline, patience, and strict risk management. One losing trade never defines the success of the system—it is the consistency of execution over time that matters.
Newsletter CTA
Enjoyed this case study?
Join the TradeLogics Newsletter to receive weekly market analysis, Smart Money Concepts lessons, real trade breakdowns, and practical trading insights delivered directly to your inbox.